
Introduction
The Garden of Genesis is a 5 man expedition in New World located in Edengrove. For more on how to complete this expedition, continue reading our Garden of Genesis Guide.
Garden of Genesis Drops
The named drops from the Garden of Genesis include the following:
Garden of Genesis Weapons
| Weapon | Where it Drops |
|---|---|
| Liveliness | Expedition Wide |
| The Land | Expedition Wide |
| The Settler’s Friend | Expedition Wide |
| Edenil | Expedition Wide |
| Sacred Woodsabre | Expedition Wide |
| Firevine Batlestaff | Expedition Wide |
| Angry Earth Exterminator | Expedition Wide |
| Winter Wish | Alluvium Marl, the Caretaker |
| Infamy | Alluvium Marl, the Caretaker |
| Blightbone Battleaxe | Alluvium Marl, the Caretaker |
| Higher Purpose | Alluvium Marl, the Caretaker |
| Entlimb | The Blighted Greenskeeper |
| Firebinder | The Blighted Greenskeeper |
| Javelin of Dryadic Empowerment | The Blighted Greenskeeper |
| Woodswarden | The Blighted Greenskeeper |
| Primordial Edge | The Blighted Greenskeeper |
| Freya’s Francisca | The Blighted Greenskeeper |
| Creeping Recurve | Taxodius |
| Subzero Spear | Taxodius |
| Tough Times | Taxodius, Tax’i, O’dus |
| Heir’s Domain | Taxodius, Tax’i, O’dus |
Garden of Genesis Armor
| Armor | Where it Drops |
|---|---|
| Warden’s Guise | Taxodius |
| Sinful Glare | The Blighted Greenskeeper |
| Blighted Growth’s Gloves | The Blighted Greenskeeper – Mutation |
| Blighted Growth’s Flaming Shoes | The Blighted Greenskeeper – Mutation |
| Blighted Growth’s Pants | The Blighted Greenskeeper – Mutation |
| Blighted Growth’s Flaming Headdress | The Blighted Greenskeeper – Mutation |
| Blighted Growth’s Chestwrap | The Blighted Greenskeeper – Mutation |
Garden of Genesis Jewelry
| Jewelry | Where it Drops |
|---|---|
| Misty Kismet Charm | Expedition Wide |
| Amulet of Seven Seasons | Alluvium Marl, the Caretaker |
| Doom’s Chance Earring | Alluvium Marl, the Caretaker |
| Oracle’s Amulet | The Blighted Greenskeeper |
| First Spring Token Band | Taxodius |
| Forest Stalker’s Earring | Named Mobs – Mutation 1+ |
Heartgem Rune & Other Resources
| Item | Where it Drops |
|---|---|
| Minor Heartrune of Grasping Vines | Alluvium Marl, the Caretaker |
| Genesis Materia | The Blighted Greenskeeper |
| Putrid Bark | The Blighted Greenskeeper |
| Sticky Vines | Named Mobs |
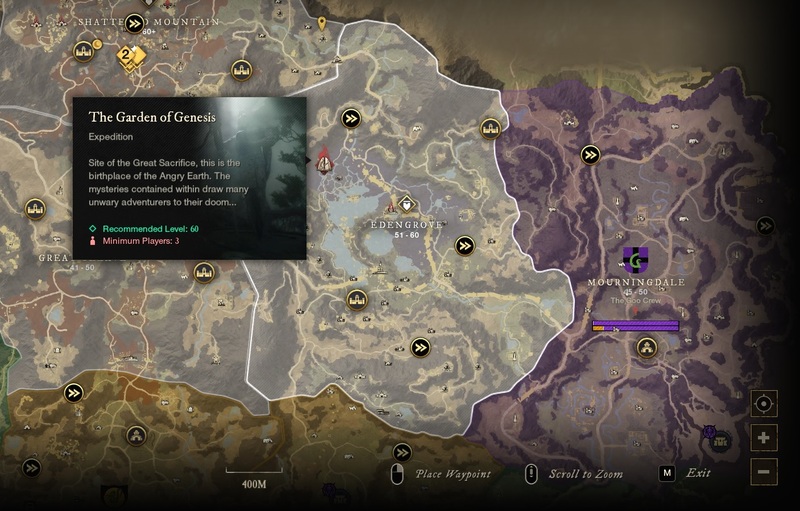
Garden of Genesis Map
Location, Entrance, and General Information
The Garden of Genesis Expedition is located in Northwest Edengove and is recommended for level 60 players. This expedition can drop up to gear score 600 items.
Types of Enemies
The Garden of Genesis only contains Angry Earth mobs. They are weak to both slash and fire damage. You can check the full list of weaknesses for all enemy types by checking our Damage Type vs Mob Type quick chart. Therefore, in order to push out maximum DPS it is recommended that you utilize weapons with slash damage. You can also use Infused Angry Earth Coatings and Infused Angry Earth Ward Potions to dish out more damage and to mitigate additional damage from the Angry Earth enemies. Additional options to help you maximize damage output would be utilizing an Angry Earth Combat Trophy
How to Enter the Garden of Genesis
In order to enter the Garden of Genesis (like all New World Expeditions), someone in your party will need to be at the entrance to enter.
There is a limit on the number of expeditions you can run.
- 15 Normal Expedition runs per player per day or 105 per week, per player.
- 35 Mutated Expedition runs per week.
You can also utilize the dungeon expedition group finder to find a group and enter the expedition. The group finder can be accessed through the expedition entrance UI or from the map by clicking on the Expedition map icons.
You can browse listings created by other players, or post your own request to join other players on your server. This tool allows you to declare your preferred team role, such as DPS, tank, or healer. You can recruit based on those roles. You can also set recruiting requirements like minimum gear score and level, then inspect members to learn their average gear score, weapons, and mastery levels.
Repeatable Quests
The only repeatable quests for the Garden of Genesis Expedition are Faction Quests. You can begin receiving the Faction Quests for this expedition starting at level 58. The Faction quests for the expedition can be obtained at the Valor Hold Outpost.
First Encounter
The first encounter in this dungeon is an elite archer called Forcos. The battle against him is fairly straightforward, the only two things to watch out for is, if you are not a tank, firstly his melee attack which deals a substantial amount of damage and secondly his area of effect volley ability, make sure you dodge that.
Right after this encounter, there are stairs that you take to reach the water filled area below. Defeat the mobs here and collect the overgrowth on the wall, which will open a door upstairs from back where you came from.
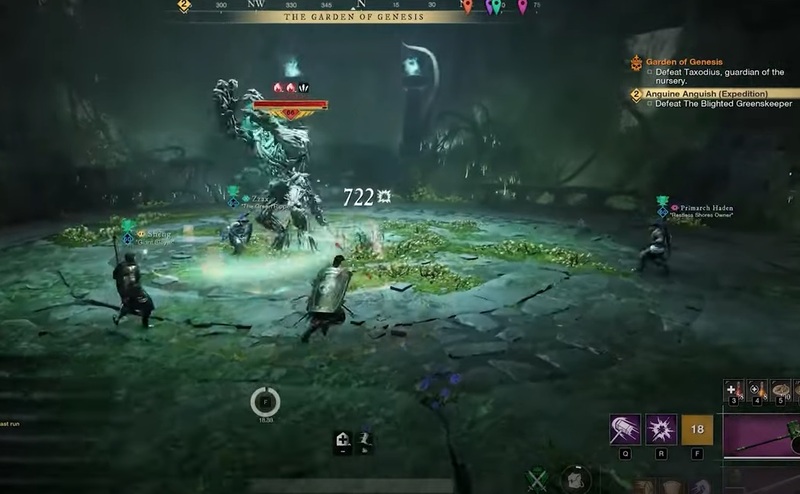
That pathway will lead you to your first actual boss: Taxodius.
Taxodius Boss Guide
Taxodius has 3 spells, the one to watch out for the most is the Unstable Swamp Fiend ability in which he pulls a fiend out of the ground which explodes shortly after. Just make sure you burst them down as soon as you can before they do. The rest of the fight is only a matter of tank and spank.
Blighted Hollow:
The next area you walk into is the Blighted Hollow. Once you eliminate the fiends and hives here you eventually reach Gorgyri, an elite shaman which behaves the same as a regular shaman only a bit stronger. Once you defeat him you eventually reach a room with a sapling tree in the middle. Defeat the mobs here and examine the sapling to collect a sapling from it and your task will update.

Heading east down the stairs you eventually reach the elite Ta’xi, which is a miniature version of Taxodius with the same abilities but weaker. Continuing along the path you eventually fall upon Aluvium Marl, the caretaker.
[ad]
Caretaker Boss Guide
The Caretaker will be invulnerable for a few seconds, so make sure you wait until after he screams to avoid wasting your cooldowns.
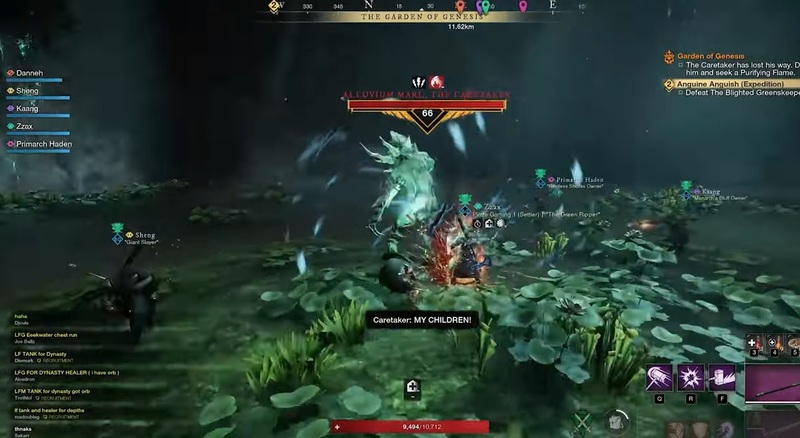
Phase 1
Once the tank is able to establish threat, you will need to place him in the center of the room and prepare to dodge his extended claw attack which he will use quite frequently; if he manages to land that ability, it will knock the player down and whatever follow-up abilities the caretaker casts will cause increased damage.
Intermittently throughout the first phase, Caretaker will cast his Blighted Projection ability, which sends a ghoul-like projection traveling the entire length of the arena in the direction the Caretaker casts it. The attack covers a wide area as it travels across the room and deals a lot of damage so players will need to remain cautious. Whenever he is about to use this attack, he will bend down and roar.
Phase 2
At around 60% health, the Caretaker reaches the second phase, wherein he will move to the center of the area and plunge his hands into the ground to cast overgrowth, which is an impassable barrier made of vines. This barrier prevents you from dealing damage to the boss from the outside of that barrier. During this phase you can go all in if you have the DPS and you can bypass the rest of fight. However, if you do not have the DPS you will want to send your tank inside the barrier, leaving the other party member outside.
Once the barrier is up there will be waves of ads that spawn on the outside of the barrier. The group will need to take out the ads as quickly as possible so when the barrier falls you only have the boss left to deal with. If you cant not take out all the ads before the barrier falls just have the tank maintain aggro of the boss and clear the remaining ads.
While the tank is inside the barrier, you will notice that Caretaker now has a stamina bar. You will need to deplete it quickly using l heavy attacks to avoid a group wipe.
If the stamina is not depleted the boss will lunge into the air performing a nuke ability that will wipe the entire group. While inside the barrier, the Caretaker will continue to use his Claw Shot and Blighted Projection abilities. You can block and dodge the abilities, or simply run around the edge of the barrier to try to avoid damage. While inside the barrier you must also live. If you get knocked down before the barrier falls then the boss will perform his nuke attack and wipe the group as well.
You will also notice a mushroom that spawns inside of the barrier. If the mushroom is killed the entire group will receive an empower buff. This will allow the group members on the outside to kill the ads much quicker, or if everyone is on the inside of the barrier you will be able to DPS the boss down much faster.
Phase 3
The Caretaker will also use the Submerge ability where he dives into the water becoming invulnerable for that duration. As he moves along underwater, he leaves blight in his wake which allows you to track him and anticipate his pouncing attacks. If you step on the blight, it will affect you with a 2minutes debuff which reduces healing. You can use Blight Tinctures to remove the effect to make things easier.
The mechanics will repeat randomly until you eventually slay him. The second time the boss moves into the center and throws up the barrier is typically a good time for the entire group to move into the barrier and DPS the boss down before the barrier falls. However, if your group simply doesn’t have the DPS just keep repeating the 4 out and 1 in strategy mentioned above (tank in and group out) until the boss is dead.
The Purifying Flame
Once the Caretaker has been taken care of, head south into a small room where you will find an expedition chest and a brazier, and use your azoth staff on the brazier to carry the Purifying Flame. Once lit the player carrying the flame will not be able to perform any other action and must carry the flame to purge the Concentrated Blight at the back of the room. The rest of the group must protect him while he does so. You can defeat the enemies past the wall if you like, but you won’t be able to proceed through there.
Once you defeat Morphian, the hive and the fiends in there, head west and clear the Blighted wall which leads you back to the Arboretum where you first collected the sapling. The mobs here will have respawned but Instead of heading back up the stairs, head west, killing mobs until you reach the Elite O’Dus. After defeating him, clear the wall behind him and have your Flame Bearer light the Brazier at the end of the hallway.
And so we reach:
The Conservatory
Upon entry into the Conservatory your objective updates to defeat Elite Archer Fulg’da.
After picking up the Expedition Chest to the left of the brazier, head down the corridor, down the staircase. Below you will find Fulg’da. Once defeated, collect the chest there, above the left staircase a door leading to the next Checkpoint should now be open. Then take the staircase leading south where you will encounter the final boss:
Blighted Greenskeeper Boss Guide
Position is important here. Melee DPS will have to stand behind her as her standard attack, quick claw, is a cleave ability that causes a lot of damage.
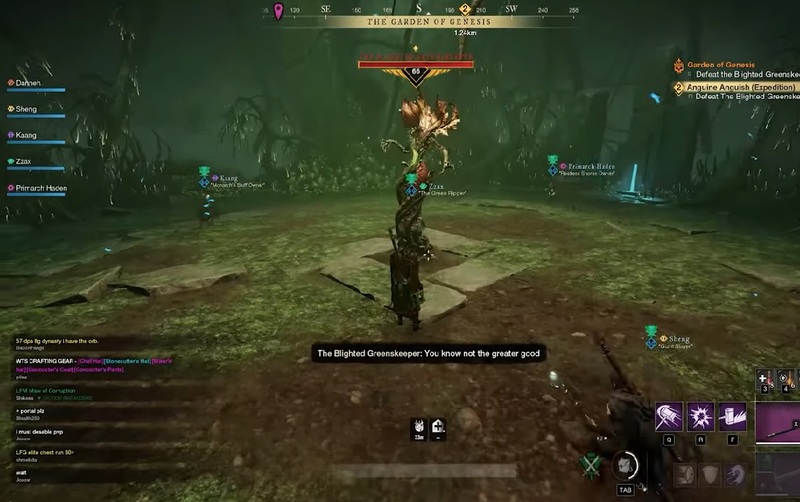
Periodically, the Greenskeeper will cast Poison Blob which summons blobs that will wander around the arena. While they’re not much cause for concern, you could avoid them to prevent an extra source of poison damage. The Greenskeeper’s will also cast Blighted Breath which deals damage and knocks players down, infecting them with Blight which reduces healing received.
She will also target a random player and cast Death Spell which infects them with a Poison and Disease debuff, this ability seemingly cannot be avoided or dodged.
At 60% health, or phase 2, as it were, she will dig into the ground becoming invulnerable and spawn two soldiers on the surface. Here she will attempt to travel to a player and Impale him from underneath, however, since her health bar can be tracked it should be fairly easy to dodge. She will attempt to impale players several times before she resurfaces again.
After resurfacing, Greenskeeper will cast Boulder Drop on a random player, first marking the area on the ground where it will land, before dropping it. The player should dodge it as it deals a lot of damage. After at least 3 boulders have fallen, she will begin channeling Poison Nova, which is an arena wide area of affect spell that kills players immediately if they did not take cover behind the boulders.
From here on, the mechanics will repeat until you have defeated Greenskeeper, at which point you have completed the Expedition.
Garden of Genesis Guide Conclusion
That completes our Garden of Genesis Guide! For more on the next expedition, the Lazarus Instrumentality, check our Lazarus Instrumentality Guide.